Sunday, July 20, 2014

Chalk Painted Table

In the office at school, there is an ugly black box that sits on the floor right by the secretaries desk.  She & I do not like the ugly box, but there is nothing we can do about it...it has to stay. So we've been trying to find a table or something to put over it to hide it.

I bought this table from my neighbor for $25.


This picture was taken after I had already started my painting process.  I pinned a post on Pinterest about making your own chalk paint & I decided to try it on this table. 
(Find post here)

I painted parts of the edges with a brown acrylic paint.  Then I used left over paint from when we he had our living room painted.  I used her recipe for making chalk paint by mixing the paint I had with Plaster of Paris.

Here is what the table looks like now!


I think it turned out great!  I painted the table with 2 coats & let it dry overnight. Distressed the edges & applied a coat of wax.  To hide the ugly box, I bought a sheet of thin wood (1/4 inch, I think), cut it to fit the space and covered in burlap.

It was fairly easy and I'm happy with the finished product.  Can't wait to take it to school & hide the ugly box!


Saturday, June 7, 2014

A Frozen Birthday

Savannah turned 6 this week!!

We try to only have big, friend-invited birthday parties every other year. So this year was a family party year.  We celebrated at home with a Frozen themed party.

The day turned out great, despite a near Pinterest fail with the Olaf cupcake cake.
It turned out ok.  The birthday girl said, "It looks great because you are my mommy!"


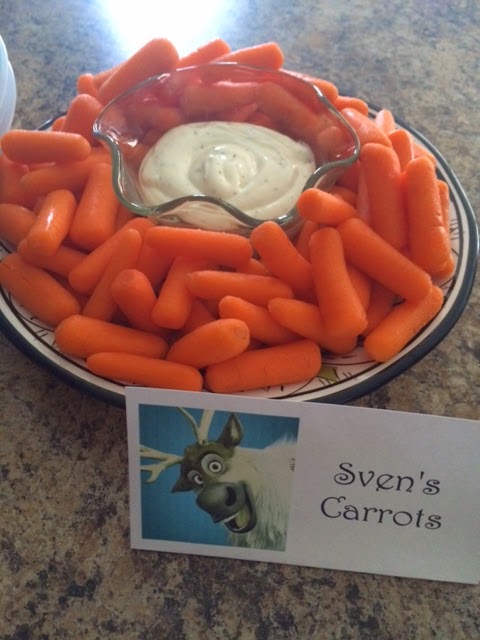
We had Anna & Elsa's chocolate dip.


Kristoff's Ice Blocks


Sven's Carrots


Olaf's Noses


I made Olaf cups out of Styrofoam cups and filled them with candy for party favors and made little snowmen faces with powdered donuts and Mike & Ike candy.


She enjoyed her party day!


It was an easy party (other than the Olaf cupcake cake fiasco...just buy black icing. As my sister said, "don't ask Missy if she wants to build a snowman")

Overall, a success.  The kids were able to swim and play while the adults got to socialize. 
A good time celebrating our girl!


Here are a few more pics from her actual birthday.

I new iPod & case.


Birthday donuts from daddy :)


Her present from Landon.


Enjoying Yogurt Mountain after dinner.


She's such a blessing!!


Friday, May 30, 2014

Summer Fun 2014--Kid Blogs

My kids started blogs today.  In 4th grade, Landon will be making up & typing stories for part of his grade.  They wrote some in 3rd grade & he wrote some really creative & funny stuff!

Part of my goal this summer is to get him more comfortable with typing.  They did some in 2nd grade and since it was timed tests, it was excruciating! (We discovered recently he has processing issues--basically don't time the kid on things. So timed typing tests--not fun!)

So, he started a blog. Unwillingly, of course, because anything Landon doesn't want to do, we butt heads on. But by the time he was done, he decided it was fun. He enjoyed changing the fonts & styles & adding pictures.

Hopefully, he will write a post everyday or so and it will help get him ready for typing stories in 4th grade.


Here is a link to his blog: Lando's Blog

Since Savannah loves to learn and do all things her brother does, she wanted to write a blog too.


Notice how she's trying to type for real, not just finger poke the letters! :)  Here is a link to her blog, I promise she really did write & type this all herself.  Savy's Blog

I feel we have a lot of things to do this summer to get ready for 4th grade.  My goal is to make it fun, but make some progress.
Praying these blogs will be part of that fun!!


Wednesday, May 28, 2014

Summer Fun 2014--Slime

Summer Fun 2014
We made Slime!!

Well it's been awhile since I've written a post.  This school year absolutely FLEW by and here we are at summer break.

My goal is to make some fun stuff and do some learning this summer.  We need to work hard to make sure we are ready for 4th & 1st grades!

For our first project, we made slime.  There are a ton of slime recipes on Pinterest. I used this Pin for our recipe. 
Basically, it's glue & liquid starch with some food coloring thrown in.  Her post also shows how to turn it into Gak and blow bubbles!!

Landon wanted to keep it slimy so we may attempt the Gak bubbles another time.


Honestly, I wasn't sure either of my kids would really want to play with slime...that's just how they are. I was right about one...and pleasantly surprised at how much Landon loved it!

I used Target brand school glue that I had found on clearance at some point.  I found the liquid starch at Kroger.


I emptied the whole bottle of glue then mixed in the starch 1/4 of a cup at a time. I think we put a little more than 3/4 cup to the 1 bottle of glue.


We added a little more starch to get it a good consistency that didn't stick to your fingers too much.


I had added the food coloring to the glue before starting to add the starch.  Then Landon decided it wanted it orange so we added red later.  I really think you could add color at any stage of mixing because the red mixed in fine to make the orange.


Fun stuff!!  We played for awhile then put it in a baggie to play with another day.


Super easy & inexpensive!  The starch cost $3.50 & we used less than a cup of it.  We had the glue & food coloring, but if you had to buy, they are cheap too. Make some & enjoy!!


Tuesday, February 11, 2014

Valentines!!!

Valentines!

I have not written a blog post in awhile!! Sorry, time just gets away.  Thought I would share the valentines the kids are handing out to their friends and teachers this year.

I pinned several ideas on Pinterest and let the kids decide what they wanted to do.

For Savannah, we did the same thing we did last year.


I made a design in an Excel document and printed 4 on a page. The top says "Have a KOOL Valentine's Day". The bottom says "Love" with 2 hearts and a place for her to write her name. 
The middle is blank to attach a package of Kool-aid. We taped that in the middle, glued a piece of color card stock on the back, put that in a clear bag with a twisty straw and there you go!! I got the idea from this pin. She has a free printable you can use. It was easy to make my own too.

Cost: (made 18 valentines)
$3 for 3 packs of 6 twisty straws
$3.60 for 18 packs of Kool-aid
$1 for pack of 25 clear bags
I think, if I can still do math, that comes to less than 50 cents for each one.

Simple & easy and since no one from her preschool is at her current school it was easy to use the same idea :).

For Landon, we went for a Mustache theme.  We liked this idea found here, but I knew he would not like "I Mustache ask you to be my Valentine". So I combined that idea of a cut-out mustache and sucker with this idea with a different saying and came up with this.


I printed a picture of a mustache and used it as a template to cut 18 mustaches out of black foam pieces. 
I made the card in Excel and printed on card stock. (4 on a page)
Punched a hole in the mustache and put it on the sucker. Punched a hole in the card, stuck the sucker stick through the card and taped the stick to the back of the card.

Who doesn't want to eat a sucker & have it look like you have a giant black mustache?

Cost: (made 18 valentines)
$2 for 2 bags of blow-pops
89 cents for a piece of 12x18 black foam
Something like 20 cents per card.

Fun & easy to make!

Teacher gifts. Found the idea on Pinterest, but the link goes no where. A box of brownie mix with a spatula.


The tag says "Shooting for Brownie Points".

Savannah also has 5th grade friends. Had to make them a happy too.  Bought small water bottles at Hobby Lobby for $2 each. Stuck a pack of M&Ms in each one, then cut their initial out of vinyl to personalize them.
Googled "M" adjectives to make different M&M tags like:
Thanks for being a Magnificent and Magical 5th grade friend.
(Savannah picked Magical :)


Didn't they turn out cute?!?!?!

We are excited for Friday!